


Contents
Ricoh (SmartSDK) v2 - Everything you need to know
This page applies to:

Last updated August 31, 2026
Contents
In August 2026 PaperCut will release an all new Ricoh embedded application for PaperCut MF. This new app will first be available via an ‘Early Access version’ of PaperCut MF, available via the Percolator Sign-up page. This page will cover everything you need to know, especially if you are familiar with the original, v1 version of the Ricoh app. This new app will introduce a PaperCut MF first, upgrading from the old device type to the new version with ‘one-click’.
What is the new Ricoh embedded application?
The new Ricoh app (known in product as Ricoh (SmartSDK) v2), is a complete, ground up rebuild of the PaperCut embedded. It includes a number of major improvements for ease of administration and user experience, as well as a consistent interface with the majority of other brands. These improvements include:
- A faster, more responsive user experience.
- A user experience aligned with other PaperCut MF embedded app.
- A simplified ‘one-click’ installation process done from within the PaperCut MF administration interface.
- The ability to upgrade the old (v1) app to the new (v2) one via a ‘one-click’ process.
- Automated certificate acceptance.
- Bulk installation (and upgrade) available via the CSV method.
- Support for the Modern UI feature released in PaperCut MF26.
Installing the new app
Single device
Installing the new Ricoh application could not be simpler! The process is entirely done via the PaperCut MF admin interface. For anyone familiar with the V1 installation, the ROC tool is no longer required. The steps are available in the Ricoh embedded v2 manual available from your PaperCut provider.
Multiple devices
Bulk installation is now done from within the PaperCut MF admin interface. This is done using the CSV method used by the majority of other brands. The steps are available in the Ricoh embedded v2 manual available from your PaperCut provider.
Upgrading from the old (v1) app to the new (v2) app
The v1 application for Ricoh will be End of Life at the launch of the new app. We have made it easier than ever to upgrade your old devices to the new application. The steps are available in the Ricoh embedded v2 manual available from your PaperCut provider, however we will summarize the steps here.
Single device
- Select the device from the Devices list in the PaperCut Admin interface.
- Scroll down to the Device Status page.
- Select the ‘Upgrade available’ option.
- Follow the instructions in the window that pops open.
- Sit back and wait for PaperCut to remove the v1 app, and install the v2 app.
Multiple devices
To upgrade a large number of devices in one go. You must use the CSV method via the steps in the Ricoh embedded v2 manual, which is available from your PaperCut Provider. The steps are very similar to a fresh bulk installation, however there are some additional checks to perform an upgrade.
When you upload the CSV, PaperCut checks to see if an existing Ricoh v1 device exists on the same IP/Hostname as the ones added to the CSV. If a device already exists, the device name must also match, or the upgrade will not occur.
The IP/Hostname and device name matching allows PaperCut to upgrade the same device record, maintaining all settings and statistics for that device.
Removing the new app
Anyone familiar with the v1 app will be plenty familiar with the ROC tool, which is used for install/uninstall/configuration of the app. As this tool is no longer required or supported for the v2 app, deleting the device could not be simpler.
- Select the device from the Device list.
- Select Delete this device.
- Accept the confirmation box.
The PaperCut MF application server will delete the device from the list, and then reach out to the MFD to delete the PaperCut v2 app, as well as undo the SP mode changes. Therefore please make sure your device is reachable by the Application Server before deleting the device.
Understanding certificate pinning
To prevent administrators from having to accept a certificate fingerprint at the device, PaperCut utilizes certificate pinning with the new application. By adding certificate pinning it allows for the system administrators to rotate their certificates. This makes it so that when a certificate is rotated the sys admin will not be required to accept the new certificate on every device manually.
PaperCut MF will utilise the copiers own root certificate store to validate the PaperCut MF Application Server’s certificate enabling the use of well known Public Certificate Authorities.
If no root certificate is available, PaperCut makes use of certificate fingerprinting enabling the use of chained and self signed certificates on the PaperCut MF Application Server. During installation and configuration the PaperCut MF Application Server will push the current fingerprint to the device.
Check the Ricoh v2 embedded manual available from your PaperCut Partner for a deep dive into how certificates work in the new app.
Everything you need to know about upgrading from the v1 app to the new v2 app.
Gen2 Ricoh Smart Operation Panels are not supported
The new embedded app for Ricoh will not be supported on Gen2 Ricoh devices. Generation 2 devices were introduced in 2017 and have been superseded by Gen2.5 and Gen3. To make sure PaperCut provides the best experience for these newer generations of devices, we must prioritize support for the modern panels found on newer Ricoh devices. Learn more in the Gen2 end-of-life article including known Gen2 models.
If you attempt to perform an upgrade on a Gen2 device, you will receive an error message and the upgrade option will no longer show in the Device Status window. Gen2 devices will continue to function on the v1 app, however please note that the v1 app is now entering the PaperCut End-of-life cycle.
Incompatible & changed configuration settings
When a device is upgraded to the v2 app, the majority of configuration settings are transferred automatically to the new app. However that are some exceptions:
Timer settings
The recommended timer settings have been changed. The new recommended settings are:
- Set System Auto Reset Timer to Off.
- Set Auto Logout Timer to your chosen value. 60s recommended.
The Auto Logout Timer only affects the idle logout when on the Ricoh native functions (Copy / Document Server etc). The System Auto Reset Timer is no longer required as PaperCut will always be the Ricoh Home App when installed.
Custom logo
If you have added a custom logo to your v1 app, you may need to edit the image as the dimensions have changed. The location of the logo remains the same.
New logo dimensions and requirements:
Image height = 50 pixels
Image width = 360 pixels
Image file format = .png
Image filename = logo.png
Image file location = [PaperCut Install Location]\server\custom\web\device\ricoh\
Color customization
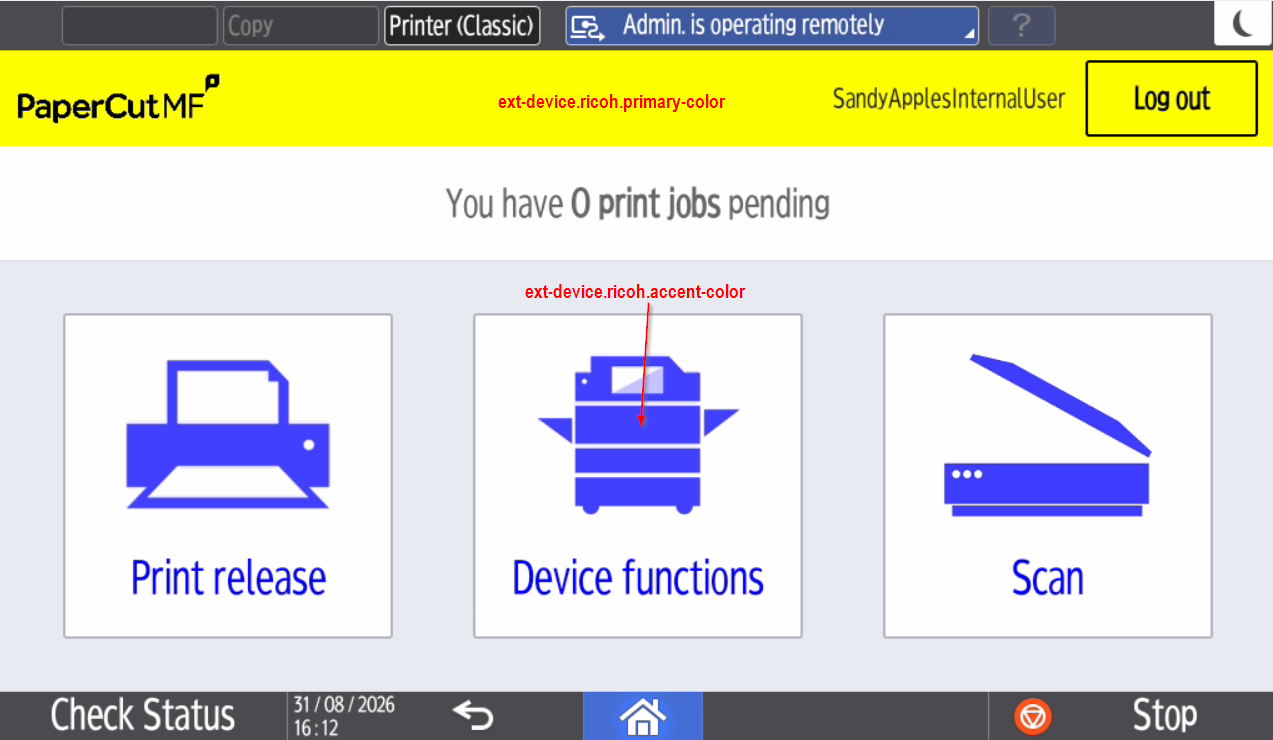
The v1 app includes two configuration keys that affect the colors of the UI:
ext-device.ricoh.accent-color
ext-device.ricoh.primary-color
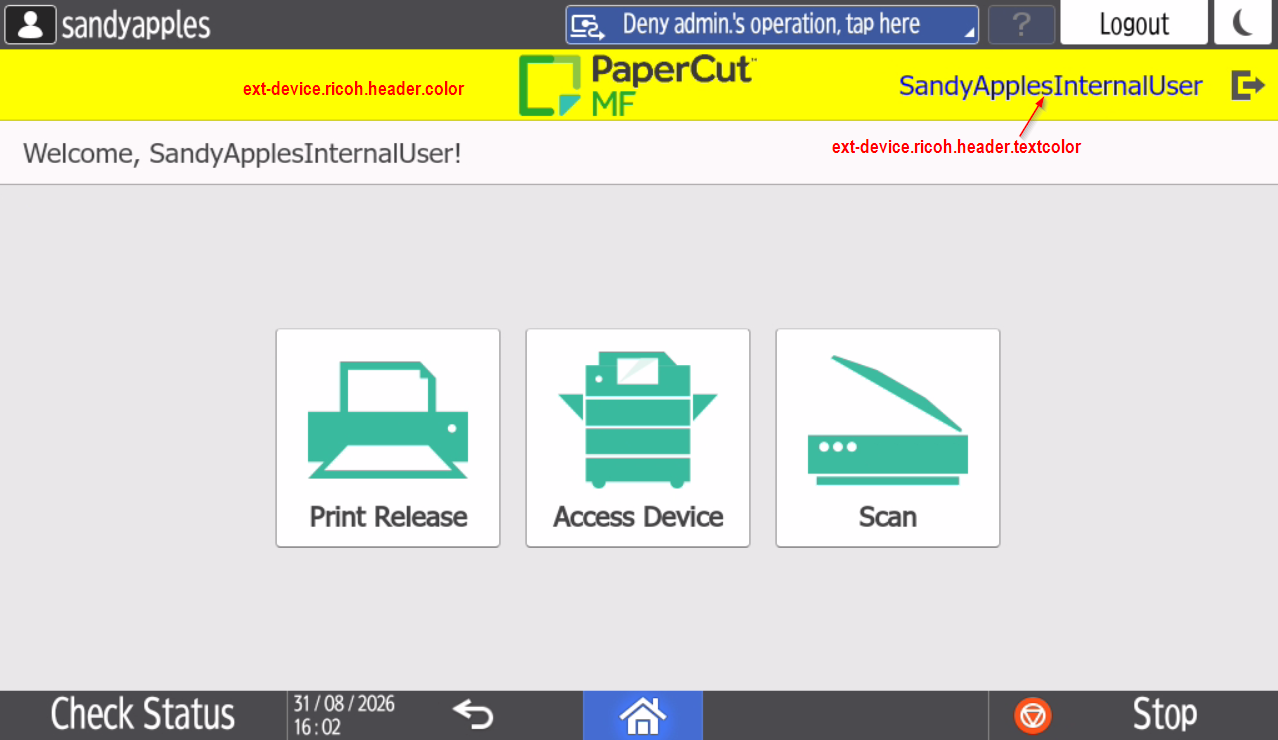
These settings do not exist in the new app, and have been matched to the common embedded interface configuration keys. The display on the device will not match 1 to 1 with the old app:
ext-device.ricoh.accent-color converts to ext-device.ricoh.header.textcolor
ext-device.ricoh.primary-color converts to ext-device.ricoh.header.color
V1 app colors
V2 app colors
Integrated Scan Actions - Rotate 90 degrees
The v1 app had a bespoke option available in Integrated Scanning that allowed you to rotate the document 90 degrees. This option has been removed in the new app in favour of a better solution.
PaperCut MF Document Processing will now auto rotate the document to the ‘readable’ direction if the OCR setting is configured. This is consistent across all devices and provides a smoother, smarter solution to this problem.
Config keys
We have mapped all possible configuration keys between v1 and v2, however there are some that are incompatible, or have been removed as they are no longer required or in use.
Removed keys:
ext-device.ricoh.ice.log-jobs
ext-device.ricoh.snmp-community
ext-device.ricoh.ice.jobs.incomplete-list
ext-device.ricoh.ice.jobs.timestamp
Ext-device.ricoh.ice.unknown-username
Additional keys:
A large number of config keys have been added as they have been inherited from moving to the PaperCut Device Web Common embedded platform. For descriptions of these keys, please visit the Ricoh embedded v2 manual, available from your PaperCut Provider:
ext-device.ricoh.account-selection.bypass-for-default-account
ext-device.ricoh.device-functions-on-login
ext-device.ricoh.direct-to-release-page
ext-device.ricoh.integrated-scanning.label
ext-device.ricoh.skip-release-screen-when-no-jobs
ext-device.scan-to-fax.advanced.enabled
ext-device.scan-to-fax.basic.disabled
ext-device.ricoh.period.ping
ext-device.ricoh.scan.edge-erase-enabled
ext-device.ricoh.scan.edge-erase-millimeters
ext-device.ricoh.timeout.complete-scan-job.secs
ext-device.block-release-on-error.paper-out-using-trays
ext-device.block-release-on-error.snmp-byte-order-mode
ext-device.inactivity-timeout-secs
ext-device.print-as-duplex-by-default
ext-device.print-as-grayscale-by-default
ext-device.ricoh.accounts.initial-tab
ext-device.ricoh.period.error
ext-device.ricoh.install-force-sp-mode-setup
Category: Reference Articles
Subcategory: Devices
Comments
Comments are not available in this preview environment. On papercut.com, this space shows the live Disqus comment thread for this page.