




This page covers how PaperCut Hive and Pocket provide serverless cloud print management within simple network environments with no restrictions on communications, and outlines the end-to-end technical workflows for job submission and release.
Examples of simple unrestricted network environments
Many smaller businesses require a simple, easy-to-use print management solution. These environments typically have few or no servers and use a simple network setup. An example is a small office with managed network switches and IT support. The office setup can range from a single subnet with internet access to a small multi-subnet setup (for example, separate subnets for staff, servers, and printers) with no port blocking between the subnets.
PaperCut Hive and Pocket are ideal for these environments because they do not require dedicated print servers, they eliminate capital expenditure, and they offer simple software configuration.
Typical customers with this setup include:
- small legal firms
- startup companies
- small-to-medium-sized offices
- retail stores
Configuring PaperCut Hive or Pocket in these environments is generally a straightforward process.
Recommended solution for printing in simple unrestricted network environments
Most examples of these environments use a standard setup with at least one Windows or one macOS computer that can access a printer and the internet. No special configuration is required.
To set up the environment, invite the users to use PaperCut Hive or Pocket, then install the client software on their computers. They are then ready to print. For more information, refer to Planning your install.
How printing with PaperCut Hive and Pocket works
For detailed information on print job submission and release in simple networks without firewall port restrictions, including ports and communications, refer to Job submission process and Find-Me job release process below.
Pros and cons of PaperCut Hive and Pocket in simple unrestricted network environments
| Pros | Cons |
|---|---|
All computers communicate freely, making edge nodes easily accessible for job storage and retrieval. | Very small organizations have a lower guarantee of an available edge node due to fewer computers. |
All computers communicate directly with printers, simplifying job routing. | Small businesses often use lightweight devices. PaperCut Hive and Pocket require Windows or macOS computers as edge nodes. You must use a Windows or macOS device for initial printer discovery, and it must remain available for job routing unless all printers support Pull Delivery. |
Network equipment usually requires no special configuration. |
Network diagram
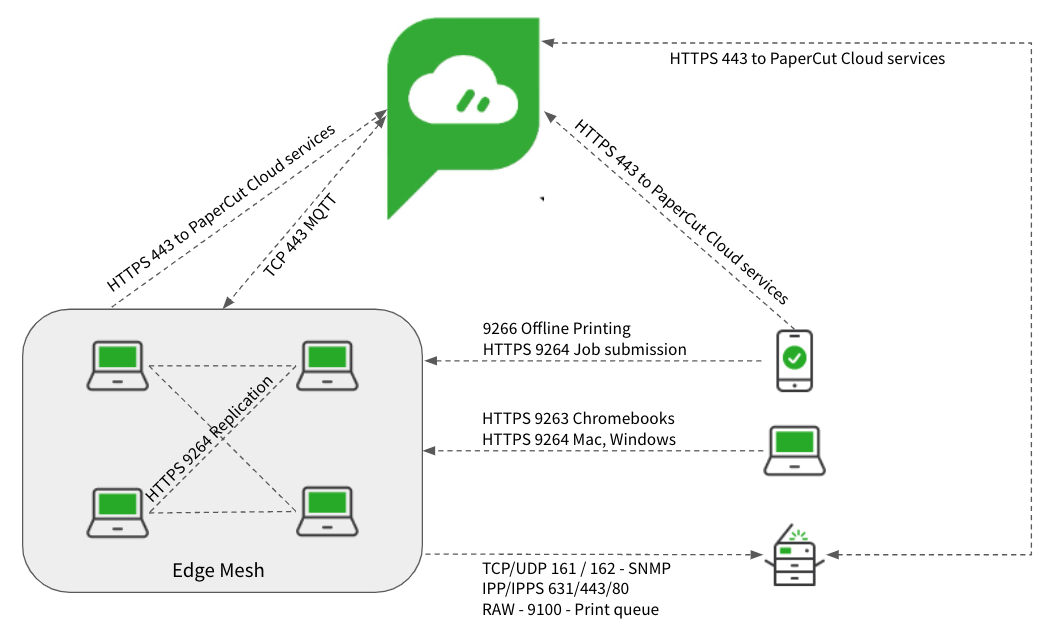
Ports
If you run the Full Embedded Printer App, some MFD platforms need additional ports opened between edge nodes and the MFD to facilitate certain device tasks. For the complete list of ports, refer to System requirements.
Job submission process
The following sections explain the process when a user prints in a simple network environment with no firewall port restrictions.
Process for Find-Me printing from Windows, macOS, ChromeOS, and Android
| Action | Comms |
|---|---|
1. The user submits a print job from a computer (PaperCut client) or a mobile device. | N/A |
2. The PaperCut client requests a list of available edge nodes from PaperCut Cloud Services to submit the print job to. | HTTPS/MQTT via port 443/8883 |
3. PaperCut Cloud Services returns a list. The client checks the list to find a suitable edge node (Windows or macOS computer) and sends the job. When printing from a Windows or macOS computer, the system usually selects the edge node running on the same device. | HTTP/S via port 9263 (ChromeOS) 9264 (Win, macOS, Android). HTTP via port 9265 (localhost only - Win, macOS). |
4. If an available edge node accepts the job, it contacts PaperCut Cloud Services to verify it was submitted by a valid source. It then requests a list of available edge nodes to replicate the job. | HTTPS/MQTT via port 443/8883 |
5. The edge node checks the list and delivers the job to additional edge nodes on the network. By default, the system replicates jobs to two edge nodes, but you can reduce this to one or zero in the print job replication advanced configuration. If set to zero, the system submits jobs only to the initial edge node and the Cloud Node (if enabled). | HTTPS via port 9264 (Win, macOS) |
6. If the Cloud Node is enabled, the edge node securely submits the encrypted print job to the Cloud Node over the public internet. | HTTPS via port 443 |
7. Between one and three edge nodes store the job, depending on configuration and availability. The Cloud Node also stores the job if enabled. The system uses a multi-part encryption key to encrypt stored jobs. | N/A |
Process for Find-Me printing from iOS
| Action | Comms |
|---|---|
1. The user submits a print job from an iOS device connected to the organization’s WiFi network. | N/A |
2. If the Cloud Node is enabled, the iOS device securely submits the encrypted print job to the Cloud Node over the public internet. The URL to submit print jobs to the Cloud Node is provided by an AirPrint profile installed by the Mobile App on the iOS device. | HTTPS via port 443 |
3. The AirPrint profile also provides URLs for configured Super Nodes. The iOS device securely submits the print job to a reachable Super Node over the organization’s network. | HTTPS via port 9264 |
4. The Super Node accepts the job and contacts PaperCut Cloud Services to verify it was submitted by a valid source. It then requests a list of available edge nodes to replicate the job. | HTTPS/MQTT via port 443/8883 |
5. The Super Node checks the list and delivers the job to additional edge nodes on the network. By default, the system replicates jobs to two edge nodes, but you can change this to one or zero in the print job replication advanced configuration. If set to zero, the system submits jobs only to the initial Super Node and the Cloud Node (if enabled). | HTTPS via port 9264 (Win, macOS) |
6. The Super Node stores the job. Depending on configuration and availability, up to two additional edge nodes also store the job. If enabled, the Cloud Node also stores the job. The system uses a multi-part encryption key to encrypt stored jobs. | N/A |
Process for Direct printing from Windows and macOS
| Action | Comms |
|---|---|
1. The user submits a print job to a Direct print queue from a Windows or macOS computer (client). | N/A |
2. The client sends the print job to the edge node running on the user’s computer. | HTTPS via port 9264 (Win, macOS). HTTP via port 9265 (localhost only - Win, macOS). |
3. The edge node contacts PaperCut Cloud Services to verify the print job was submitted by a valid source. It then requests the destination printer's known IP address. | HTTPS/MQTT via port 443/8883 |
4. PaperCut Cloud Services returns the printer IP address, and the edge node attempts to reach the destination printer. If the printer and printing port are available, the edge node sends the job to the printer. If the destination printer cannot be directly reached by the edge node, the job is cancelled. | SNMP via port 161/162. RAW printing via port 9100. |
Find-Me job release process
When a user releases a Find-Me print job, they can use two methods:
After the user releases their job, how you configure PaperCut Hive or Pocket determines the job’s route to the destination printer.
To have the printer retrieve and print jobs directly from PaperCut Cloud Services, configure Pull Delivery for a supported destination printer and enable the Cloud Node. The printer will retrieve and print jobs directly from the Cloud Node.
If Pull Delivery is not configured, at least one edge node on the network needs access to the printer to route and print the job. For more information, refer to Pull Delivery in PaperCut Hive.
When Pull Delivery cannot be used, PaperCut Hive or Pocket selects an edge node to relay the job to the destination printer. By default, the Autopilot algorithm attempts to select the most reliable client device to deliver the print job, which then relays the job.
Alternatively, if you want to control the route that remote jobs take through the network, apply a Print Delivery Profile to a printer to specify which clients can be selected to deliver print jobs to that printer. For more information, refer to Autopilot - Overview and About Print Delivery Profiles.
Releasing jobs at the MFD
| Action | Comms |
|---|---|
1. At the MFD, the end user logs in to PaperCut Hive using the touchscreen. | HTTPS via port 443, plus additional ports for certain brands |
2. PaperCut Cloud Services returns a list of available jobs. The jobs appear on the touchscreen. | HTTPS via port 443 |
3. The user selects the print jobs they want to release, modifies the job settings if necessary (for example, double-sided), and selects Print. | HTTPS via port 443 |
4. If the Cloud Node is enabled and Pull Delivery is configured for the printer, the printer retrieves the jobs directly from the Cloud Node and prints them. | HTTPS via port 443 |
5. If Pull Delivery is not configured, PaperCut Cloud Services contacts edge nodes to issue the job release command. If a Print Delivery Profile applies to the printer, PaperCut Cloud Services contacts the clients specified in the profile. Otherwise, the Autopilot algorithm nominates edge nodes based on reliability. For print jobs submitted from a Windows or macOS computer, this is usually the edge node running on that device, provided it can reach the printer. | HTTPS/MQTT via port 443/8883 |
6. The selected edge node retrieves a copy of the job. The edge node retrieves the job from any edge node holding a replicated copy accessible on the main network. The edge node can also retrieve the job from the Cloud Node (if enabled) if all other edge nodes are unreachable. | HTTPS via port 443 (Cloud Node retrieval). HTTPS via port 9264 (edge node retrieval). |
7. The edge node holding the job attempts to reach the specified printer. If available, the edge node sends the job to the printer using a configured print delivery protocol (for example, IPPS), and the job prints. | SNMP via port 161/162. IPP/IPPS printing via port 80/443/631. RAW printing via port 9100. |
Releasing jobs from a mobile device
| Action | Comms |
|---|---|
1. The user launches the PaperCut Mobile App on their mobile device (iOS or Android). The Mobile App contacts PaperCut Cloud Services to find the user's print jobs. | HTTPS via port 443 |
2. The Mobile App displays a list of print jobs ready for release. | HTTPS via port 443 |
3. The user selects the print jobs and modifies the job settings if necessary (for example, double-sided). | N/A |
4. The user selects Print document, then selects the printer from the list. Depending on the mobile release options configuration, the user can also select the printer using a QR code, NFC tag, or printer Release Code. The Mobile App relays this release request to PaperCut Cloud Services. | HTTPS via port 443 |
5. If the Cloud Node is enabled and Pull Delivery is configured for the printer, the printer retrieves the jobs directly from the Cloud Node and prints them. | HTTPS via port 443 |
6. If Pull Delivery is not configured, PaperCut Cloud Services contacts edge nodes to issue the job release command. If a Print Delivery Profile applies to the printer, PaperCut Cloud Services contacts the clients specified in the profile. Otherwise, the Autopilot algorithm nominates edge nodes based on reliability. For print jobs submitted from a Windows or macOS computer, this is usually the edge node running on that device, provided it can reach the printer. | HTTPS/MQTT via port 443/8883 |
7. The selected edge node retrieves a copy of the job. The edge node retrieves the job from any edge node holding a replicated copy accessible on the main network. The edge node can also retrieve the job from the Cloud Node (if enabled) if all other edge nodes are unreachable. | HTTPS via port 443 (Cloud Node retrieval). HTTPS via port 9264 (edge node retrieval). |
8. The edge node holding the job attempts to reach the specified printer. If available, the edge node sends the job to the printer using a configured print delivery protocol, and the job prints. | SNMP via port 161/162. IPP/IPPS printing via port 80/443/631. RAW printing via port 9100. |
Releasing jobs from a mobile device using Print Offline
If the link to PaperCut Cloud Services is unavailable (for example, an Internet Service Provider outage), users can still release print jobs using their mobile device if:
- the Print Offline feature is enabled
- the mobile device is connected to Wi-Fi on the organization’s main network
- the mobile device can communicate with nearby edge nodes
- a nearby edge node stores a replicated copy of the job.
For more information, refer to About printing offline.
| Action | Comms |
|---|---|
1. The user launches the PaperCut Mobile App. The Mobile App detects that the internet connection is down and switches to looking for local edge nodes. | HTTPS via port 9266 |
2. The edge nodes return a list of available print jobs to the Mobile App. | HTTPS via port 9266 |
3. The user selects the print jobs and modifies the job settings if necessary (for example, double-sided). | N/A |
4. The user selects Print document, then selects the printer from the list. Depending on the mobile release options configuration, the user can also select the printer using a QR code, NFC tag, or printer Release Code. The Mobile App relays the release request to nearby edge nodes. | HTTPS via port 9266 |
5. The edge nodes communicate to find the node holding the print job to issue the release command. | HTTPS via port 9264 |
6. The edge node holding the job attempts to reach the selected printer. If available, the edge node sends the job to the printer using a configured print delivery protocol, and the job prints. | SNMP via port 161/162. IPP/IPPS printing via port 80/443/631. RAW printing via port 9100. |
Comments
Comments are not available in this preview environment. On papercut.com, this space shows the live Disqus comment thread for this page.