




Use Print Deploy to seamlessly roll out printer changes and maintain a reliable print infrastructure as your organization grows. This page provides step-by-step instructions to manage print queues and zones.
- Zones: Updating IP ranges, user groups, hostnames, and subnet priorities.
- Print Queues: Adding, renaming, updating drivers, and handling printer maintenance or replacements.
For other administration or advanced backend tasks, like configuring updates or backups, refer to Configure Print Deploy (optional).
Zones
- Add or delete an IP range in a zone
- Add or remove user groups in a zone
- Add or change computers in a zone
- Change the order (priority) of zones
- Delete a zone
- Add a new subnet
- Add a print queue or optional print queue to a zone
Print queues
- Add a print queue into Print Deploy
- Modify a print queue from optional install to automatic install
- Modify a print queue to be the default for the zone
- Remove a print queue as the default for the zone
- Remove a print queue from a zone and users’ computers
- Handling scheduled or unscheduled printer maintenance
- Delete a print queue
- Replace a printer
- Rename a printer
- Update a printer driver
- Delete a printer driver
- Add finishing options
Administration
- I want to use my own SSL proxy for Print Deploy on a different port than normal
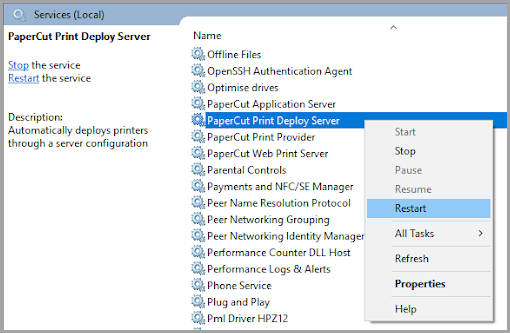
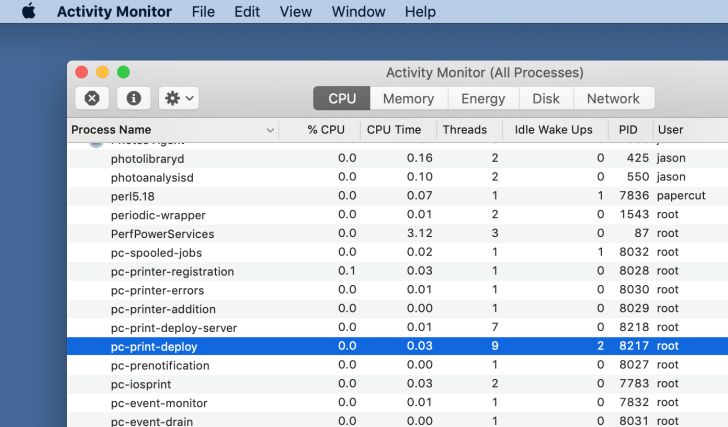
- Stop/start or restart the Print Deploy Server service
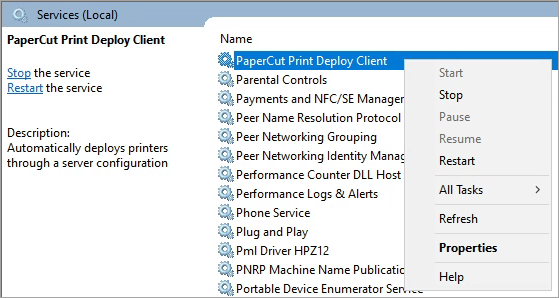
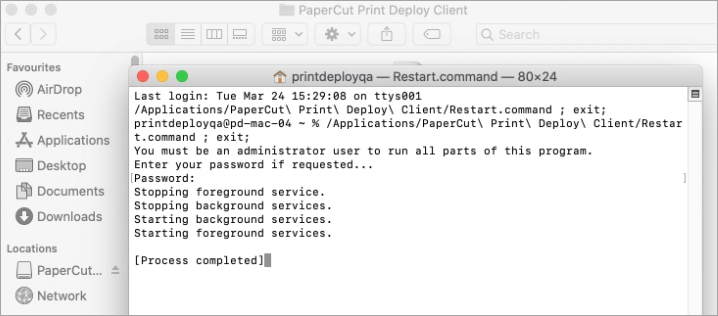
- Stop/start or restart the Print Deploy clients
Add or delete an IP range in a zone
-
In the Your zones list, select the zone you want to work on; then click Edit zone, and Edit zone again.
-
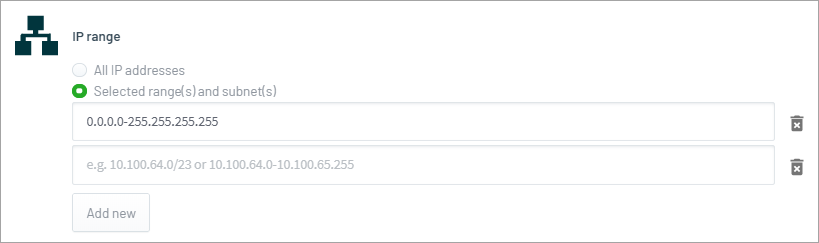
In the Edit zone popup, under IP range select Selected range(s) and subnet(s).
-
Click Add new. A new field is added to the list.
-
To:
- add an IP range, type the IP address or subnet details
- delete an IP range, click the trash icon.
-
Click Save.
Add or remove user groups in a zone
To add users to a zone, the users must first exist in a group in PaperCut NG/MF. For general information about user groups in PaperCut NG/MF, including how to add, remove, and update user groups, take a look at Groups in PaperCut NG/MF.
If you delete a user from a group but you still want them to be able to print, make sure to add them to another group that is in the zone that the user needs to print from.
-
In the PaperCut NG/MF Admin web interface, click Groups; then check the Group List to ensure that the group(s) exists.
-
Click Enable Printing to go to the Print Deploy page.
-
In the Your zones list, select the zone you want to work on; thn click Edit zone and select Edit zone.
-
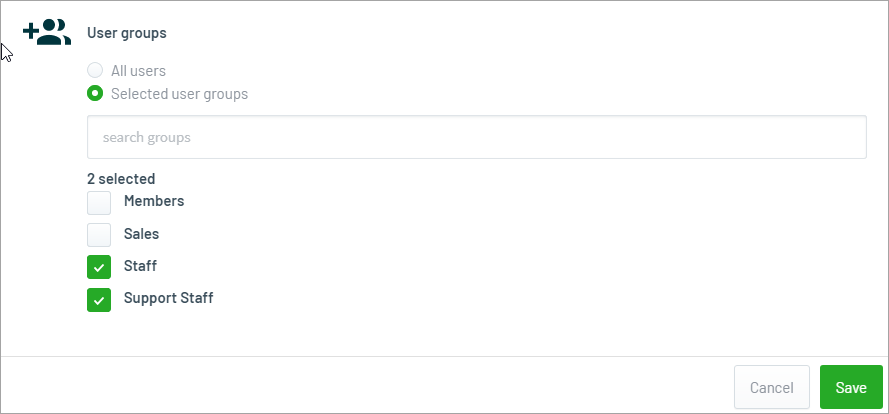
In the Edit zone pop-up, under User groups select Selected user groups. A list of all PaperCut NG/MF groups is displayed.
-
Select/deselect the groups of users you want in the zone. These are the users who will receive the print queues that are connected to the zone.
-
Click Save. The Print Deploy page is displayed with the groups listed above the Edit zone button.
-
Click Save and deploy. Print Deploy deploys the print queues to the users in the group(s).
The print queues will be automatically installed or deleted on the computers within 15 minutes. This time is configurable though, which is described in Enhance Print Deploy security (optional).
Add or change computers in a zone
To target different computers for a zone you can use an industry standard regex expression to filter based on computer hostnames.
-
In the Your zones list, select the zone you want to work on; then click Edit zone, and Edit zone again.
-
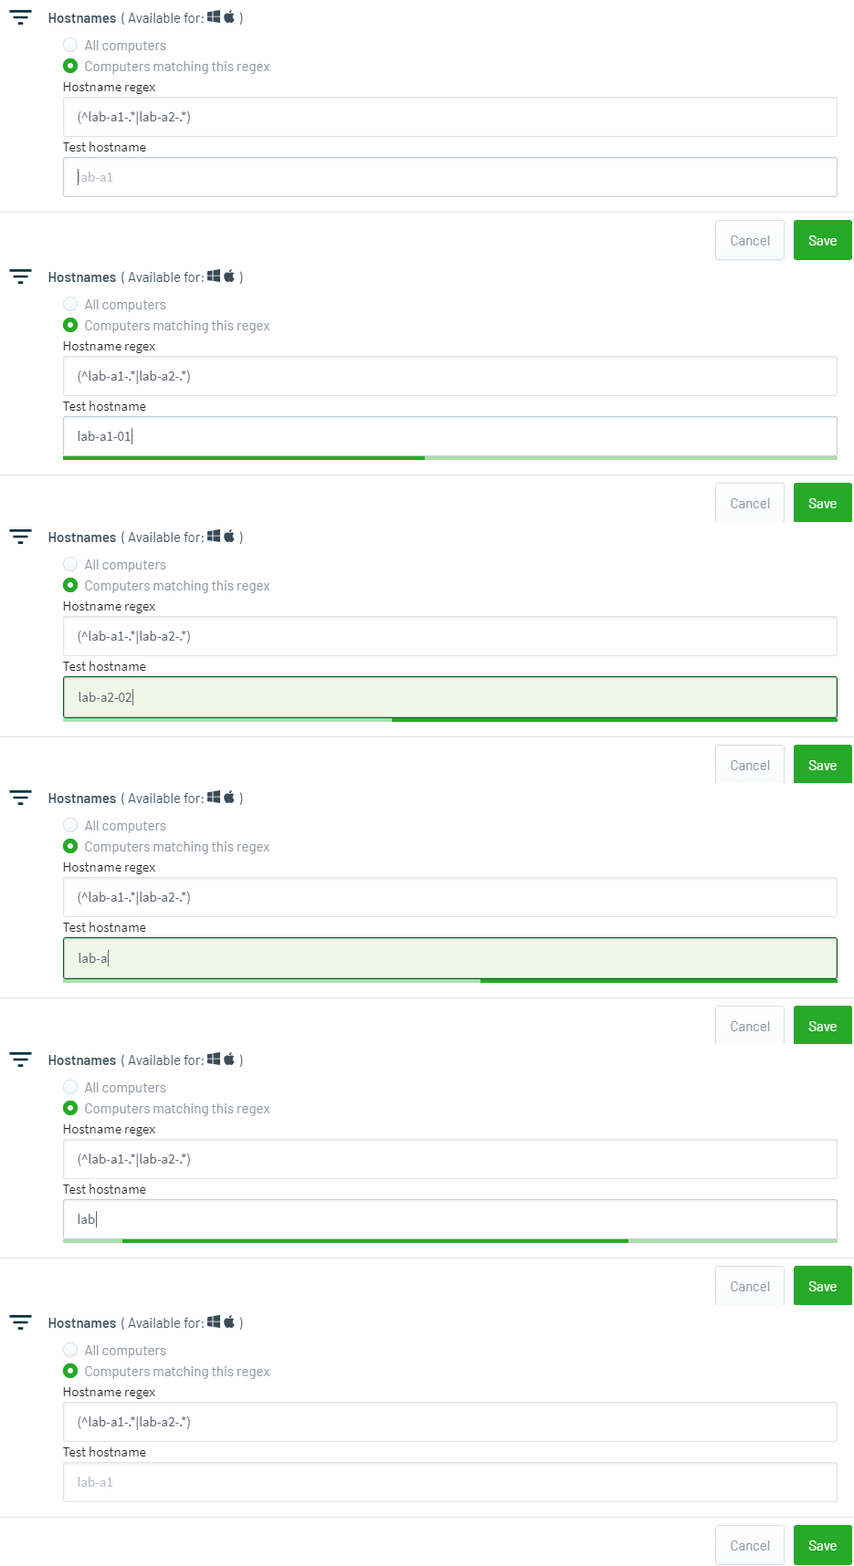
In the Edit zone popup, under Hostnames select Computers matching this regex.
-
Enter a valid regex expression to the Hostname regex field.
-
Test your regex expression by filling out the Hostname test field with a real hostname.
- A green text field means a positive match and the printers in the zone are applied to that user.
- A red text field means a negative match and the printers in the zone are NOT applied to that user.
Change the order (priority) of zones
Administrators can set the order (priority) of zones to ensure that the nominated default printer in the highest ordered Zone is set as the default on the end user’s computer. This is particularly useful where printers available on a computer are across several zones.
You can sort the order by name, priority, or drag-and-drop.
-
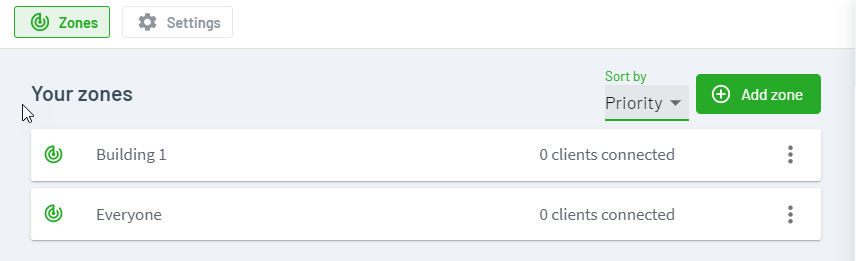
In the Print Deploy admin interface, click Zones. The Your zones list is displayed.

-
If you want to sort by name, click the Sort by drop-down list and select Name. The zones are sorted.
-
If you want to sort by priority:
- Click the Sort by drop-down list and select Priority. A vertical ellipses is displayed at the end of the row for each zone.
- Do one of the following for each zone:
- Click and drag the zone to its new place in the order.
- Click the ellipses and click the appropriate direction until the zone is in the order you want it.
- Click the Sort by drop-down list and select Priority. A vertical ellipses is displayed at the end of the row for each zone.
Delete a zone
-
On the Print Deploy admin interface, click Zones. The Your zones list is displayed.
-
Click the zone you want to delete.
-
Click Edit zone; then click Delete zone. A pop-up is displayed asking if you’re sure you want to delete the zone.
-
Click Delete.
Print Deploy removes the zone from the list.
Add a new subnet
If you’ve created a new VLAN on your site (for example, if you have a new branch office or campus with printers on site), you need to make sure there is a zone that includes that subnet range.
New subnets are included in any zone that specifies the IP range as All IP addresses (that is, do not restrict access based on IP address).
If you don’t have a zone that specifies All IP addresses, you should set up a new zone to manage the printers available in that subnet, or you should add the new subnet range to an existing zone.
To add a subnet to a new zone
-
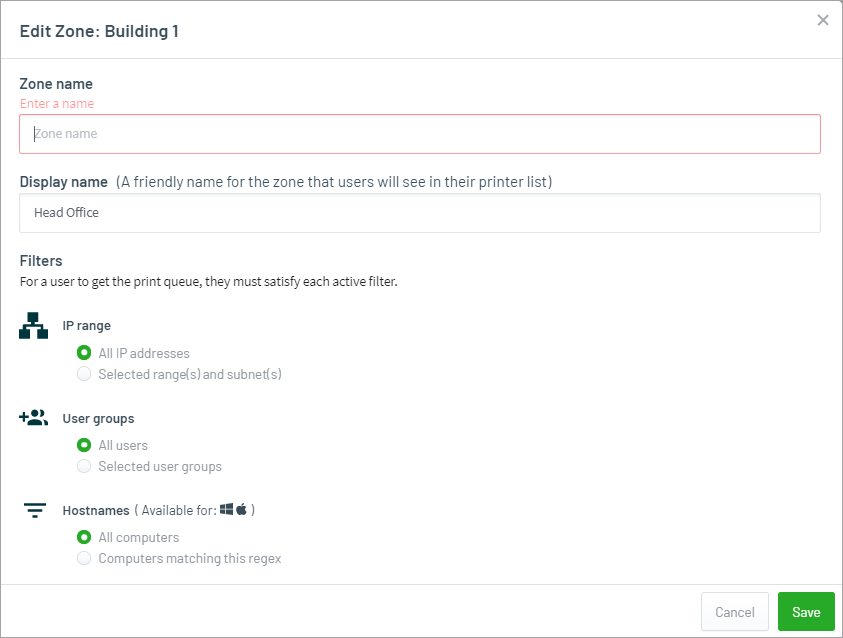
Click Add zone. The Add zone popup is displayed.
-
In Zone name, type a name that clearly reflects the where the zone is. For example, Melbourne Office Level 5.
-
Under IP range > Selected range, click Add
-
Enter one or more IP subnets (CIDR) or IP address ranges using the format
x.x.x.x-y.y.y.y(for example,0.0.0.0-255.255.255.254).Use a selected range if, for example, you want to set up a zone for each campus or building, and restrict access to the print queue outside of that campus or building.
If you want to add multiple IP ranges, repeat the steps the above steps.
-
Click Save. Your new zone is added to the list of zones on the Print Deploy Admin interface.
To add a new subnet to an existing zone
- In Your zones, select a zone.
- Click Edit zone.
- Under Selected range, click Add new.
- Enter your IP range in one of the following formats:
- CIDR, for example,
10.100.10.0/24 - IP address with netmask, for example,
10.100.10.0:255.255.255.0 - IP address range, for example,
10.100.10.0-10.100.10.254
- CIDR, for example,
- Click Apply.
Add a print queue into Print Deploy
From time to time, you might want to add a new print queue to your environment. This could be for any number of reasons including:
- adding a new printer to your fleet
- adding a new finisher to an existing printer
- splitting an existing queue that allows both color and Black and White, into two separate queues; one for color, and one for Black and White.
To set up a new print queue:
-
Set up the print queue on your reference computer:
-
Run the cloner tool to upload the print queue information to the Application Server.
-
Add the print queue to a zone.
- In the Admin web interface, click Enable Printing.
- In the Your zones drop-down list, select the zone containing the print queue.
- In the Print queues list, select a print queue.
- If you want the print queue to be optional for the user to install on their computer, at the bottom of the list select the Optional install checkbox. (Note: the optional checkbox is available in v1.3 and later. For Chromebook users, optional print queues is not applicable.)
- Click Connect to zone.
- Click Save and deploy.
Add a print queue or optional print queue to a zone
-
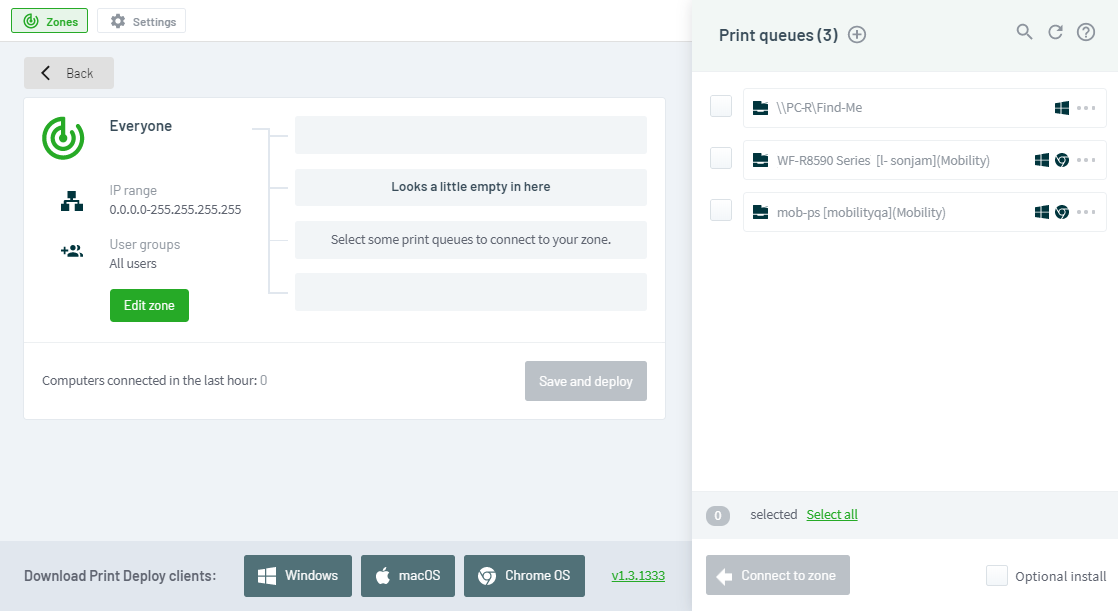
Click Zones, then in the Your zones list, select the zone you want to connect printers to.
If you need to add a new zone first, take a look at how to add zones and user groups to Print Deploy.
-
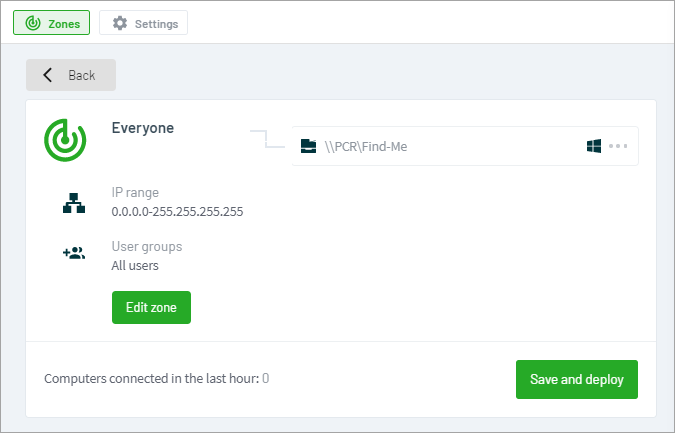
In the Print queues list, select which printers you want to be automatically installed on the users’ computers; then click Connect to zone. They are added to the list of print queues for that zone.
-
If required, add print queues to the zone that you want to make optional for users to install on their computer. They can install them via the Add printers tab in their Print Deploy client.
-
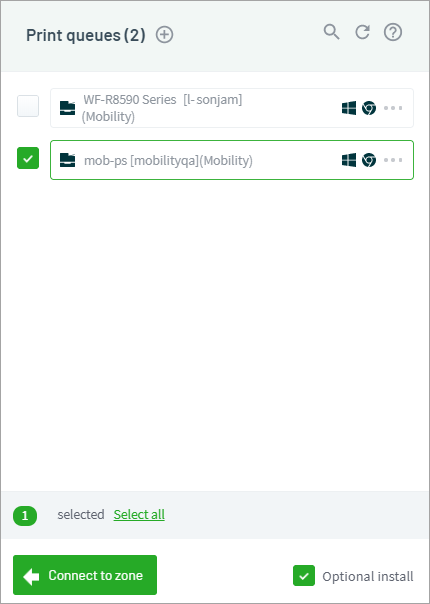
In the Print queues list, select which printers you want to make optional for users to install.
-
At the bottom of the list of printers, select the Optional install checkbox.
-
Click Connect to zone. They are added to the list of print queues for that zone.
-
Handling scheduled or unscheduled printer maintenance
Sometimes you might want to temporarily make one of your printers unavailable. For example, if a printer is offline, you can temporarily hide its print queues so that your users don’t try to print to it.
To hide a print queue:
- In the Admin web interface, click Enable Printing.
- In the Your zones drop-down list, select the zone containing the print queue.
- Click the ellipses menu at the right of the print queue you want to remove; then click Remove print queue.
- Click Save and deploy.
When the printer is back online:
-
Open the zone again.
-
Select the printer; then click Connect.
-
Click Save and deploy.
The Print Deploy clients installed on end users’ computers will retrieve the updated list of print queues the next time they contact the Application Server.
Delete a Print queue
Use these steps to permanently remove a print queue in Print Deploy, for example, when decommissioning an old printer.
- In the Admin web interface, click Enable Printing to open the print deploy tab ** **
- Click the Print queues button.
- In the Print queues list, find the printer you want to remove.
- Click the three dots (
⋮) and select Delete from the dropdown. - Click Delete print queue to confirm the action.
Replace a printer
Every organization will replace their printers over time. This might happen because a single printer is getting a bit long in the tooth, or maybe you are undergoing a fleet refresh.
To replace a printer when the new printer is using the same driver:
- Configure the new printer with the same network address as the old printer. The print queues that were deployed for the old printer will work for the new one.
To replace a printer when the new printer uses a different driver, but the printer should maintain the same name as the old printer:
-
On the reference computer, set up a test print queue with a different name to the printer that will be decommissioned.
-
Run the cloner tool.
-
Deploy the print queue to a test computer by connecting the printer to a test zone.
-
If you are happy with the deployment, then update the name of the print queue on the reference computer to match the name of the original printer that is being decommissioned.
-
Run the cloner tool again.
The existing print queue is updated and the change is automatically deployed to end users. There is no need to Save and deploy the zone again.
Rename a printer
Print Deploy identifies print queues by their name. To prevent accidentally deleting existing print queues, Print Deploy clones a new queue under the new name and keeps the old one instead of overwriting it.
To rename a printer:
1. Rename the desired printer on the reference computer.
2. Run the cloner tool again, this will clone the print queue with the new name and it will now be available within the Print Deploy UI.
3. A copy of the print queue with the old name will still be present in the UI. If you are happy with the settings and new name of the printer, remove the printer with the old name.
Update a printer driver
New versions of printer drivers are continually released. When they are available, you should make sure you update your print queues to use the latest version.
To update your printer drivers:
-
On the reference computer, set up a test print queue with a different name to the previous print queue.
-
Run the cloner tool.
-
Deploy the print queue to a test computer by connecting the printer to a test zone.
-
If you are happy with the deployment, then update the name of the print queue on the reference computer to match the name of the original printer queue.
-
Run the cloner tool again.
The existing print queue is updated and the change is automatically deployed to end users. There is no need to Save and deploy the zone again.
Delete a printer driver
It’s possible to manually delete a print driver from a printer in Print Deploy.
This may be handy if you don’t want a printer to appear for certain operating systems. For example, if you’ve imported a Mobility Print queue which supports all OS types by default, but you prefer Mac users to use a different print queue with another driver, then deleting the macOS driver from a Print Deploy queue might be the solution.
- On the Print Deploy admin interface, click Print queues. The Print queues list is displayed.
- Click the zone you want to delete.
- Next to the printer you want to edit, click the 3 dots (⋮) and click View details to open the Options menu.
- Click the three dots next to the driver you want to remove and click Delete driver.

Add finishing options
You might want to change the default finishing options, or even prevent some users from selecting particular finishing options. For example, you might decide you don’t want students to be able to do stapling, but you do want this functionality available to staff.
To change the finishing options available in a print queue:
-
Add the finishing options to the print queue on the reference computer. For advanced finishing options, configure the capabilities under:
- Printer Properties > General > Preferences
- Printer Properties > Advanced > Printing Defaults
Some printer drivers may have settings available in the following tabs:
- Printer Properties > Device Settings (example: hp)
- Printer Properties > Configuration (example: fuji-xerox)
- Printer Properties > Optional Settings (example: epson)
-
Test that printing works on each print queue.
-
Rerun the PaperCutPrint Deploy cloner tool. It automatically updates the end users’ print queues with the new finishing options so there is no need to Save and deploy the zones again.
I want to use my own SSL proxy for Print Deploy on a different port than normal
Some organizations might want to use a proxy or SSL/TLS termination service as a front end to as many products as possible. For example, managing SSL/TLS certificates in many different systems might be difficult and the organization prefers to have a SSL/TLS termination service or device handle all SSL/TLS certificates.
You can configure the Print Deploy client to use an Administrator-specified SSL/TLS port while the Print Deploy Server service remains unchanged. In addition, you can configure the Print Deploy client to use a custom SSL/TLS port for Mobility Print print queues.
This is an advanced configuration setting that’s made in the client.conf.toml file. It’s expected that system administrators undertake this with an existing proxy or SSL/TLS infrastructure in place.
The config values that change the SSL/TLS ports in use are:
AccessibleMobilityPrintTLSPort = 9164AccessiblePrintDeployTLSPort = 9174
- Update the config values in the client.conf.toml file, located in:
<PaperCut NG\MF installation folder>\providers\print-deploy\<os>\data\config\client.conf.toml - Restart the PaperCut Print Deploy Server service.
Stop/start or restart the Print Deploy Server service
Some configuration changes require that you to stop/start or restart the Print Deploy Server service for the changes to take effect.
Windows
- Open Windows Services.
- Right-click PaperCut Print Deploy Server; then click the action you require.
macOS
- Open the Activity Monitor.
- Click View > All Processes.
- Select pc-print-deploy; then click Quit.
The Print Deploy services will automatically start up again.
For starting and stopping the Print Deploy Server, run the following commands:
- Stop:
sudo launchctl unload /Library/LaunchDaemons/papercut-print-deploy.plist - Start:
sudo launchctl load /Library/LaunchDaemons/papercut-print-deploy.plist
Linux
On Linux, run the following commands consecutively:
- Stop:
sudo systemctl stop pc-print-deploy - Start:
sudo systemctl start pc-print-deploy
Stop/start or restart the Print Deploy clients
Rarely, some configuration changes require you to stop/start or restart the Print Deploy clients for the changes to take effect.
Windows
- Open Windows Services.
- Right-click PaperCut Print; then click the action you require.
macOS
-
Open finder to Applications > Print Deploy Client.
-
Double-click the Restart.command.
-
Enter your password when prompted.
The Print Deploy services will automatically start up again.
Linux
On Linux, simply run the following commands consecutively:
- Stop:
sudo systemctl stop pc-print-deploy-client - Start:
sudo systemctl start pc-print-deploy-client
Comments
Comments are not available in this preview environment. On papercut.com, this space shows the live Disqus comment thread for this page.