




This topic explains how to import Mobility Print queues with a specific print driver into Print Deploy to enable advanced finishing options, such as stapling and hole punching.
Importing Mobility Print queues supports environments that use Google Workspace or Entra ID as a user directory, manage users manually in PaperCut NG/MF, or use a custom identity source. PaperCut NG/MF does not rely on traditional Kerberos to authenticate computers that are not joined to a local domain. Instead, Mobility Print authenticates users.
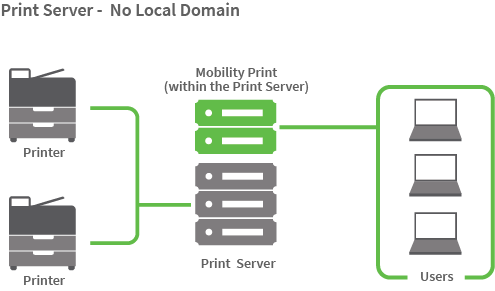
Step 1: Set up your Mobility Print queues
Mobility Print works with Print Deploy to enable Windows and macOS users to securely print to any printer in your network, without the need for the computers to be joined to the local domain.
Everything you need to know about Mobility Print is covered in the Mobility Print Help Center.
- In the Admin web interface, go to Enable Printing > Mobile & BYOD.
- Follow the steps to install and configure Mobility Print. Don’t set up any printing defaults and capabilities. You’ll do this next, when you set up the reference computer.
Step 2: Set up the print queues on the reference computer
A reference computer is a Windows or Mac computer where you set up and test print queues before deploying them to users. On the reference computer, you set default print queue settings (grayscale and 2-sided printing) and capabilities (finishing options like stapling and hole punching).
Windows drivers often support multiple architectures, for example, AMD64 and ARM64. PaperCut NG/MF automatically detects which architectures the driver supports and displays them in the Admin web interface.
-
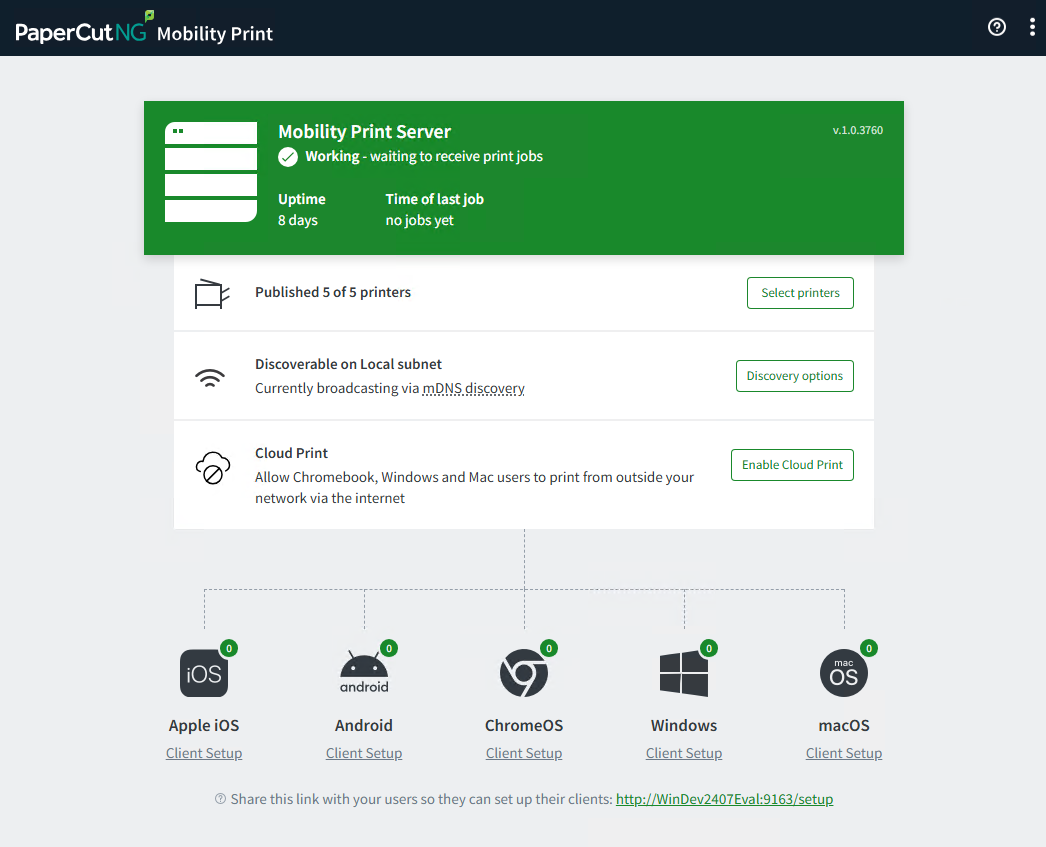
From your reference computer, open Mobility Print and click the client setup page link. The link is at the bottom of the Mobility Print Admin interface.
Depending on your printer discovery method in Mobility Print, the page looks something like this:
-
Follow the steps on the page to install your print queues on the reference computer.
-
Instead of using the default PaperCut Global Print driver, update the driver for each print queue to match the driver you would like to deploy to users.
-
Configure the printer defaults for each queue.
- If you’re happy to use the Global Print Driver (Windows) or generic print driver (Mac), use the cloner tool to clone it into Print Deploy.
- If you want to use more advanced finishing options, update the driver on the print queue.
- Windows: Printer Properties > Advanced > Printing Defaults
- Mac: via the CUPS Web Interface, available via: http://localhost:631/ or http://servername:631/ Later, when you install the Print Deploy client on the users’ computers, these defaults will be propagated to be the default user settings.
- See here for detailed instructions on these steps.
-
Test that printing works on each queue.
Step 3: Clone the print queue details into Print Deploy
-
On the reference computer, log in to PaperCut NG/MF (which is installed and running elsewhere on the network).
-
Select Enable Printing > Print Deploy. The Print Deploy page is displayed.
-
In the right panel, do one of the following:
- If this is the first time you’re using Print Deploy, click the Download cloner tool button for your operating system.
- If you already have print queues installed, click Add or update; then click the download button for your operating system The cloner tool (.exe, .dmg) is downloaded with the PaperCut NG/MF server address embedded into its filename.
-
On the Reference computer, run the cloner tool. The cloner tool bundles all of the print queues, printer drivers, default settings (for example, grayscale, 2-sided) and capabilities (for example, finishing options like stapling and hole punching) and uploads the bundle automatically to the Application Server. All of the print queues are displayed in the Print queues list at the right of the Print Deploy page.
For Windows print queues, Print Deploy automatically detects whether the queue type is Print via server or Print direct. However, Mac print queues default to Print via server, so if you have a print serverless (Direct Print) environment, you need to change the print queue type. To change the print queue type:
- In the Admin web interface, click Enable Printing.
- In the Print queues list, click the three dots icon next to the print queue you want to update.
- In Type, select Print direct.
- Close the pop-up.
Common cloner errors to watch out for
| Error | Cause | Fix |
|---|---|---|
no printers found in the system |
Cloner is running as a different user to the one who installed the printers | Log in as the same user who installed the queues and run the cloner as that same user.See Cloner Troubleshooting. |
not copied: Cloud Print for Mobility Print |
You are trying to clone a Mobility PrintCloudqueue | Cloud queues are not supported. Use on-premise Mobility Print queues only |
uses a WSD port. not cloned |
Printer is using an unsupported port type | Reconfigure the queue to use a supported port.See Cloner Troubleshooting. |
Manufacturer drivers
By default, importing Mobility Print queues into Print Deploy deploys the queues with the PaperCut Global Print Driver. While the PaperCut Global Print Driver is compatible and supports basic features like duplex and grayscale printing, administrators often replace the generic driver with a manufacturer-specific driver for the following reasons:
-
Advanced finishing options: Accesses manufacturer-specific features, for example, stapling, hole punching, booklet folding, and tray selection, which the generic driver does not support.
-
Authentication and native features: In environments without a traditional local domain (for example, environments using Google Workspace, Azure AD, or non-domain-joined computers), Mobility Print authenticates users. Replacing the driver on the client side allows Print Deploy to deliver jobs over the Mobility Print protocol while providing users with the native manufacturer print dialogue and capabilities.
-
PrintNightmare mitigations: Microsoft PrintNightmare mitigations restrict standard users from installing shared printer drivers from a Windows print server without local administrator rights. These restrictions often cause User Account Control (UAC) prompts or installation errors, for example, error 0x0000011b. Because Mobility Print can bypass Point and Print restrictions, it allows Print Deploy to push queues and manufacturer drivers to standard users without requiring administrative credentials.
-
Automated installation: Print Deploy automates the installation of configured queues and drivers on workstations using the Print Deploy Client, eliminating manual setup.
Change the driver to the manufacturer’s driver on Windows
Replace the generic Mobility Print driver with the manufacturer-specific driver on Windows:
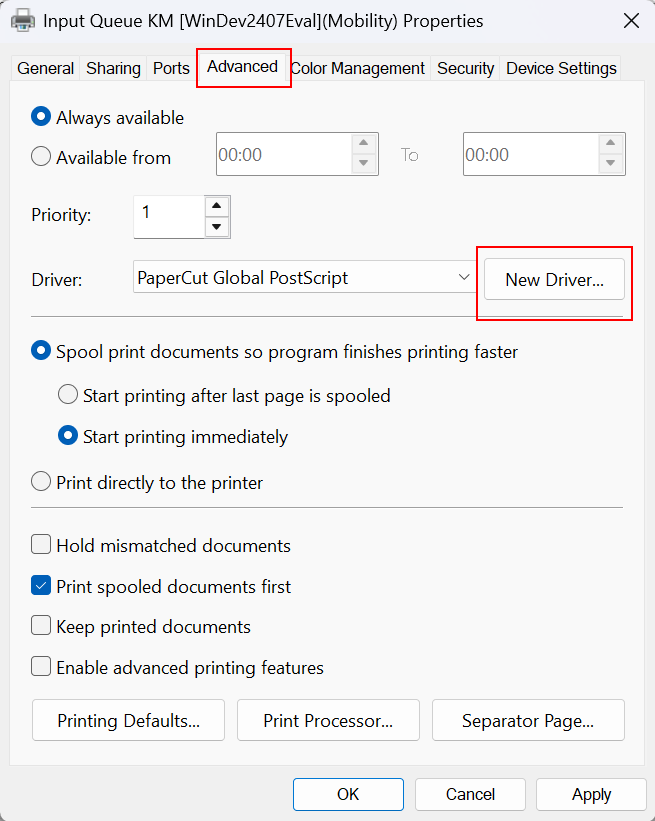
- On the reference computer, open Devices and Printers.
- Right-click the Mobility Print queue and select Printer Properties.
- Go to the Advanced tab.
- Click New Driver… and follow the driver wizard to install your manufacturer’s driver.
- Once the driver is installed, click OK to save changes.
Change the driver to the manufacturer’s driver on macOS
If you are using macOS, replace the generic driver using the CUPS web interface:
- On the reference computer, open a web browser and navigate to
http://localhost:631to open the CUPS web interface. - Select the Printers tab, then select the queue you want to update.
- From the Administration menu, select Modify Printer.
- Press Continue to cycle through the menus until you reach the driver menu.
- Change the driver or provide a PPD file.
- Set any required printing defaults by selecting Administration > Set Default Options.
- Repeat these steps for each print queue.

Add the queue to a zone and deploy
Add the cloned print queue to a zone in Print Deploy to deploy it to workstations:
- In the PaperCut NG/MF admin interface, go to Enable Printing > Print Deploy.
- In the top ribbon, select Zones.
- In the Your zones menu, select the appropriate zone.
- Add the cloned queue to the zone.
- Click Save and deploy.
Sign in required
By default, Mobility Print requires a separate authentication step when adding print queues, which displays the “Sign in to install” prompt even if the user is already logged into Print Deploy.

In managed environments, such as domain-joined or company-owned devices, you can bypass this secondary prompt and allow the username reported by the operating system to be associated with the print job when configuring TrustReportedUsernameMode. Please confirm the username reported by the operating system does link to an existing username or username alias in PaperCut.
Enable TrustReportedUsernameMode on the Mobility Print server
Update the Mobility Print server configuration to trust reported usernames.
- Stop the PaperCut Mobility Print service.
- Open the following configuration file in a text editor as an administrator:
[app-path]\PaperCut Mobility Print\data\config\mobility-print.conf.toml - Locate the setting
TrustReportedUsernameModeand set it totrue:TrustReportedUsernameMode = true - Save the file.
- Restart the PaperCut Mobility Print service.
Set the Print Deploy user identity method to TRUST
Configure Print Deploy identity settings to complete the trusted username setup.
See Set the method used to determine the user’s identity
Why installation of the driver may still fail
A Print Deploy queue using a manufacturer driver installs successfully when the driver is already trusted on the computer, but fails when Windows requires administrative elevation to stage the driver.
Microsoft PrintNightmare mitigations prevent standard users from installing new, unstaged printer drivers. Installation success depends on the following factors:
-
Driver staging:
- Successful installation: If the workstation previously installed the driver, the driver files exist in the local Windows Driver Store. Print Deploy maps the printer using the existing local driver without requiring administrative elevation.
- Failed installation: On a new or reimaged computer, Windows must stage the driver files into the Driver Store for the first time. Staging requires administrative elevation, which triggers a User Account Control (UAC) prompt. Because the Print Deploy Client runs silently, the client cannot display the UAC prompt, and the installation fails.
-
Driver certificates and trust
Windows evaluates the digital certificate associated with a print driver when determining whether to install the driver automatically. A print driver might be digitally signed by the printer vendor but still fail automatic installation if Windows does not trust the certificate or does not recognise the signature as meeting the requirements for the chosen installation method.
- Trusted driver certificates: Drivers with a valid, Microsoft-recognised signature and trusted certificate generally install without additional user intervention.
- Vendor-signed drivers: Some printer vendors sign drivers using their own certificates rather than a Microsoft or Windows signature. Although the driver is legitimately signed, Windows will block automatic installation if the workstation does not trust the vendor certificate.
- Certificate trust issues: If Windows does not trust the vendor certificate, print driver deployment might fail or display a Windows Security prompt asking the user to confirm whether to trust the software. Untrusted certificates block Print Deploy from automatically installing the associated print driver and queue.
- Resolving certificate issues: Export the vendor’s signing certificate from the driver’s
.catsecurity catalogue and install it into the appropriate trusted certificate store. In managed environments, distribute the certificate centrally using Group Policy. See here for full instructions. - Driver package awareness: Determines how Windows handles driver deployment during installation. Package-aware drivers, indicated by
PackageAware=TRUEin the driver’s.inffile, generally integrate cleanly with Windows Point and Print deployment rules. You can find.inffiles inC:\Windows\System32\DriverStore\FileRepository\. Standard universal drivers, such as HP Universal PCL6 or Lexmark universal drivers, are also typically compatible with these deployment requirements. Drivers that are not package-aware, for example, certain versions of Kyocera KX drivers wherePackageAwareis missing, might be treated as unsafe by Windows. When deployed silently, these drivers can trigger a User Account Control (UAC) prompt and prevent silent installation.
Important: Certificate trust and driver package awareness are separate considerations. A driver can be package-aware but still have a certificate trust issue, or non-package-aware with a valid trusted signature. Check both properties when investigating automatic print-driver deployment failures.
Other installation failures in client logs
| Error/Exit code | Common cause | Resolution | Example log |
|---|---|---|---|
| Exit Status 3 | Invalid driver certificate, untrusted driver, or architecture mismatch (e.g., deploying x64 to ARM64). | Windows rejects the driver package during silent installation because the certificate is untrusted, or the driver architecture does not match the client OS. | > pc-print-deploy-client.exe: STDOUT|ERR Failed to install printer [Printer]: installdrv command failed: unknown error: exit status 3. pc-print-deploy-client.exe: STDOUT|Error installing driver. Error: failed to install. Possibilities are, invalid driver certificate or wrong architecture |
| Exit Status 11 | TheServer(LanmanServer) Windows service is stopped or disabled on the workstation. |
The Print Deploy updater runsnet sessionto verify if it has administrator/root privileges. If this service is inactive, the check fails even if running as SYSTEM.Start theServer(LanmanServer) service on the client machine and set its Startup Type toAutomatic |
> pc-print-deploy-client.exe: STDOUT|ERR Failed to install printer [Printer]: installdrv command failed: unknown error: exit status 11. <br><br> pc-print-deploy-client.exe: STDOUT|No root access. Are you running as root? pc-print-deploy-client.exe: STDOUT|Command installdrv failed. Error: No admin access. |
Check the troubleshooting guide for installation and client fixes.
What’s next?
 Add zones and deploy print queues to them
Deploy print queues to individual clients (optional)
Comments
Comments are not available in this preview environment. On papercut.com, this space shows the live Disqus comment thread for this page.