Before you start
- Make sure the printers you want to create print queues for are discovered and listed in the Printers tab.
- Read and understand the known limitations of this feature.
- If your users need specific finishing options, such as hole punching, prepare a custom Windows or macOS print queue with the manufacturer driver you need . This print queue will contain the printer driver you deploy to your users. Otherwise, you can use the built-in PaperCut Global Print Driver (Windows).
- Ensure your network is secure:
- Prevent users from bypassing PaperCut by implementing the following best practices:
- Move printers to a separate network (Find-Me printing only).
- Block or disable the USB ports on printers.
- Disable protocols such as WSD, Bluetooth, and AirPrint (Bonjour).
- If you have strict firewall rules and policies, enable all the firewall and networking requirements. Follow the PaperCut Hive and Pocket system requirements .
- Prevent users from bypassing PaperCut by implementing the following best practices:
1. Start creating a PaperCut print queue
Start creating either a Direct print queue or Find-Me print queue. For an explanation of each, see Direct print queues vs Find-Me print queues .
-
In the admin console left menu, click Print Queues. The Print Queues page displays the default, built-in PaperCut Printer (Find-Me print queue) and any other print queues created previously.
-
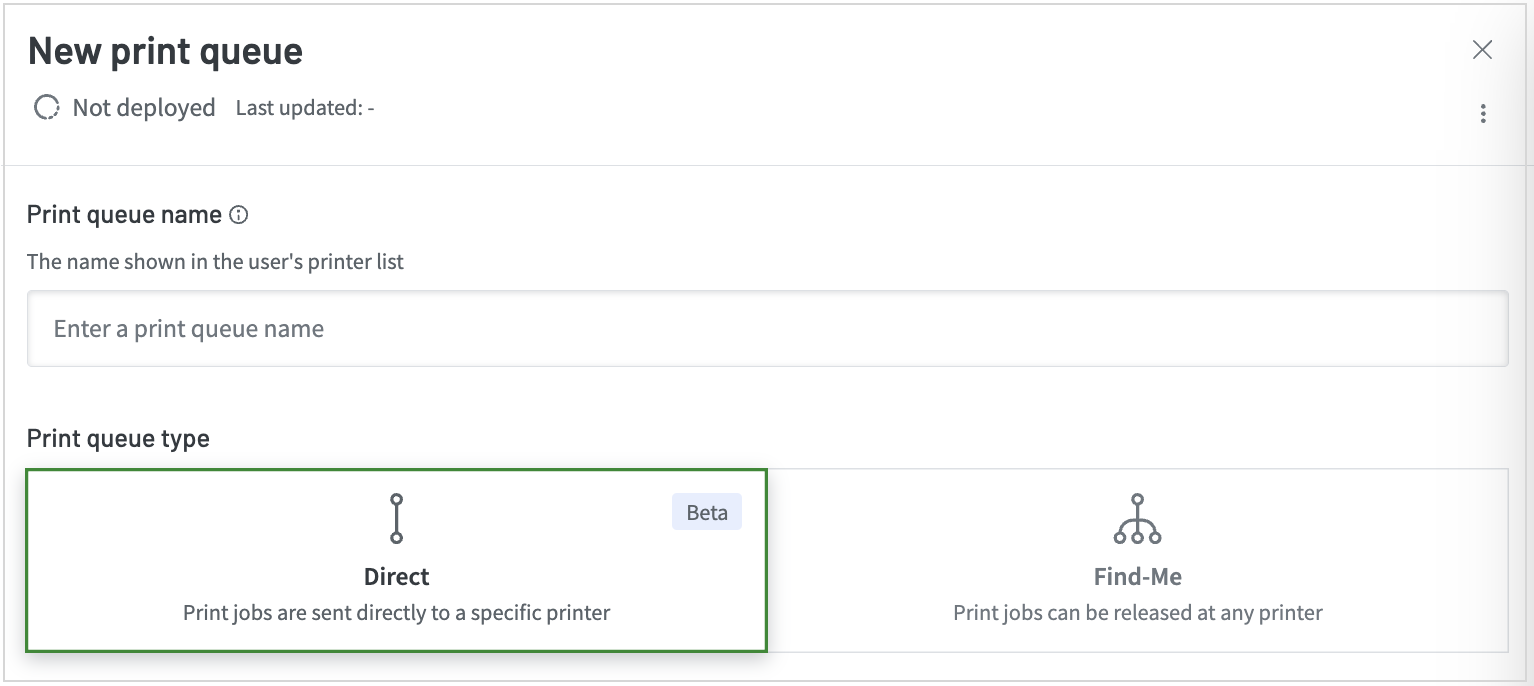
Click Create print queue. The New print queue panel is displayed.

-
In the Print queue name field, type a name for the print queue that users will understand. The name will be displayed in the list of printers for their device. The Direct print queue type is selected by default.
-
Select the print queue type you require.
- Direct:
a. In the Printer section, click Select Printer.
b. In the Printer panel, select the printer you want users to print directly to.
c. Continue to 2. Choose the printer driver . - Find-Me: Continue to
2. Choose the printer driver
.
- Direct:
2. Choose the printer driver
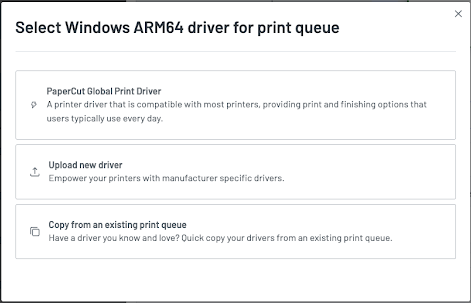
- In the Drivers section, click Add driver. The Select {operating system/architecture name} driver for print queue popup, is displayed. For example, this is the popup for a Windows ARM64 driver:

- Select one of the following options:
-
PaperCut Global Print Driver: Compatible with most printers. Provides finishing options that users mostly use.
-
Upload new driver: Manufacturer-specific printer driver to get more advanced finishing options, or to set default finishing options for users.
-
Copy from an existing print queue: Copy a printer driver you already know works well from another print queue in PaperCut Hive or Pocket.
-
- Follow the steps in the user interface to finish the driver configuration.
Troubleshoooting uploading a new printer driver
Client software is out of date and needs to be updated message
When you choose the Upload a new driver option, you might be notified that the client software is out of date and needs to be updated.
To update the client software:
In the admin console, go to Settings > Advanced and switch Diagnostic Mode to on (green).
Go to Edge Mesh and select the three-dot menu on the outdated edge node (client software). A drop-down menu appears.
Select Update Now. A pop-up opens.
Select Update Now. The client software (edge node) updates.
When selecting a computer to copy a driver from, and you can’t find your reference computer
It's possible that you’re configuring a print queue for a different operating system or architecture from the one on your reference computer.
For example, if you are configuring the Windows ARM64 print driver, then your reference computer should also be a Windows ARM64 computer.
Alternatively, check that the PaperCut Hive or Pocket client software is running on the computer and its internet connection is active.
3. Determine who to deploy the print queue to (create deployment rules)
By default, a print queue is deployed to all users. You can use deployment rules to define who receives the print queue and/or in which location they need to be before they can receive it.
Rules comprise conditions and values. Within each single condition, you can define multiple values. Here’s how that works:
Condition | Values | Requirement to satisfy the condition |
|---|---|---|
Limit to network | Network IP subnet ranges and gateways | User must be connected to ANY ONE of the defined networks |
Limit to hostnames | Hostnames or regex patterns | User's computer only needs to match ANY ONE of the defined hostnames |
Limit to individual users | User accounts (email addresses) | User must be ANY ONE of the defined users |
For a detailed overview of deployment rules, see Deployment rules — define print queue recipients .
-
In the Recipients section, select who to deploy the print queue to:
- All users: go to step 7 of this procedure.
- Specific recipients: go to step 2 below.
-
Select Use deployment rules, then select Create rule. The Create new deployment rule panel is displayed.
-
In the Deployment rule name field, enter a name for the print queue that users will understand. It will be displayed in their list of printers.
-
In Conditions, select and configure one or more condition types. For detailed steps, click the relevant link.
Limit to network
Add one or more networks. Users connected to any of the added networks will receive the print queue. To set up Limit to network:
Select the Limit to network checkbox. The Add network button is displayed.
Click Add network.
(Optional) If you have previously added one or more networks, the networks display in the Select existing tab. If applicable, select one or more of these existing networks.
Click the Define new network tab.
In the Network name field, enter a name for the network that will help you recognize it again in the future (for example, based on the network’s location).
In the Subnet field, enter the IP subnet range using CIDR (Classless Inter-Domain Routing) notation. For example, enter
192\.168.1.1/24to specify the range192.168.1.x(Optional) To limit the network to a specific Gateway, select the Limit to a specific Gateway checkbox. The Gateway MAC address field is displayed. In the Gateway MAC address field, enter the MAC address of the router.
Select Save. The Create new deployment rule panel is displayed.
(Optional) If you would like to add more networks, repeat steps 1 to 8.
Limit to user groups [coming soon]
Coming soon.
Limit to hostnames
Allows you to define specific computers to receive the print queue. (Useful when managing a print lab!). To set up Limit to hostnames:
Select the Limit to hostnames checkbox. The Hostname matches field is displayed.
In the Hostname matches field, either:
enter or paste a comma-separated list of hostnames
in the list of comma-separated hostnames, you can optionally use a regular expression instead to match multiple hostnames. To use a regular expression, start and end the value with /. For example, the entire entry in Hostname matches could be something like /^conference-room.*/, /^.*?mac$/
Example regular expressions
Regular expression (already added / to specify that regex is used)
Description
Example matches
Example non matches
/^.*?mac$/
Matches any hostname that ends with mac
willem-mac
vuthy-mac
macdonalds
/^conference-room.*/
Matches any hostname that starts with conference-room
conference-room
conference-room-01
main-conference-room-01
/(?i)janescomputer/
Case-insensitive match of janescomputer
Janescomputer-01
janescomputer
lab-JANESCOMPUTER
bretscomputer
Limit to individual users
Allows you to deploy the print queue to specific individual users. To set up Limit to individual users:
- Select the Limit to individual users checkbox. The Search for users field is displayed.
- In the field, start entering a user’s email address. After the user’s email appears, select it to add it. Continue adding more email addresses as necessary.
-
Select Save.
-
To set up more deployment rules, repeat this procedure from step 1 to 6 until you’ve added all the rules you need.
-
In the Notes section, add any notes that might help you with managing your print queues.
-
Click Save. The print queue is now ready to deploy.
4. Determine when the new print queue will be deployed
Now you need to decide if you want to deploy the new print queue to your users (or test users).
In the Deployment section, select whether you want to immediately deploy the print queue when it is saved.
Updating the printer driver for an existing print queue
To update a print queue’s printer driver:
- Go to Print Queues and select the print queue you want to update. A panel is displayed showing the queue’s details.
- In the Drivers section, select the 3- dot menu and select Update driver. The Select driver for print queue popup is displayed. Here’s an example of a popup for a Windows printer driver.

- Select the option you require, then follow the steps in the interface.
Undeploy a Direct print queue
If you want to decommission a printer or need to alter a print queue, you can undeploy it from your users’ computers. Doing this will remove the print queue from the user’s computer.
There are two options to undeploy a print queue.
Undeploy from within a print queue
- Go to the Print Queues page and find the row for the print queue you want to undeploy.
- Select the print queue. The print queue details page is displayed.
- Scroll to the Deployment section, and select “No, remove print queue from users’ computers”.
- Click Save. The print queue has started to undeploy (this can take a while to complete).
- The print queue status is now Not deployed.
Undeploy from the Print Queues page
- Go to the Print Queues page and find the row for the print queue you want to undeploy.
- Select the 3-dot menu and click Undeploy. A popup is displayed explaining it can take a while to complete.
- Click Close. The print queue status is now Not deployed.
Managing a print queue’s deployment rules
You can create new, modify, and delete one or more deployment rules all from within the print queue.
- On the Print Queues page, select a queue that uses the deployment rule you want to manage. The print queue’s panel is displayed.
- Under Recipients, in the Deployment rules section, select Manage rules. The Manage deployment rules for <print queue name> panel is displayed.
- Do one of the following:
-
Update a rule
a. Select the rule want to change, then select the 3-dot menu.
b. Select Details, make the changes, then select Save. -
Delete one or more rules
Select the rules, then for each rule select the 3-dot menu and select Delete.
-
Best practices
When to create multiple print queues
Create multiple print queues in a Find-Me environment where users print to a virtual print queue but release to any printer.
If you have printers from multiple vendors, or from the same vendor but the printers are significantly different, you should use multiple printer drivers, each deployed on a separate print queue. The manufacturer’s website will indicate the models supported by each driver.
You might also want multiple print queues that use the same printer driver but have different default print settings. For example, one queue could default to Black & White (grayscale) printing, and another to color, with names to match. This can save users time when they’re selecting the appropriate queue when printing, and save users from having to change (potentially confusing) print settings.


Comments